Sometimes stuff goes wrong, and you just need to stop

IMG_0120.JPGSo, as you can see in this photo below, I need to make an access hatch for the transmission tunnel. I want it to be flush fitting and reasonably strong.

I’ve taken a mould from this, and made the flat sheet for the top plate (2 layers of 300gsm, one layer of 200gsm gives 1.05mm thickness).

I then made the adhesive to bond the two – infusion resin mixed with glass microbeads to make a paste. All good.


I filled the bottom panel with adhesive, clagged the two together and clamped them. After that, I popped it in the oven at 60C for about 30 mins to kick the exotherm off (with fast resin) and I left it alone for a while. I even remembered to cover the facing side with bagging film to stop it getting mucked up when the adhesive ran out as the parts were compressed.
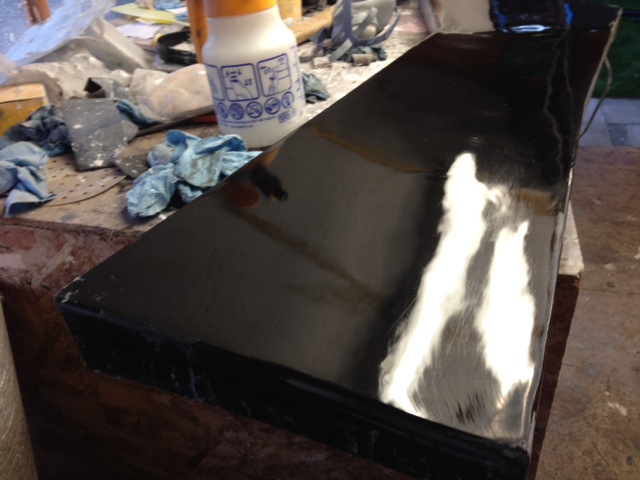
Disaster!


IMG_0131.JPGIt’s not easy to see from this, but what I think has happened is that the heat from the oven has started to set the adhesive from the outside in, sealing it. Then this has kicked off the exotherm inside which has caused the adhesive to expand, but because the outside edges are setting and gripping, and the adhesive wants to expand and can’t. So, it warps.


I now need a different and better method, which I’m cooking up right now. Either a much slower cure, or cross drill it (where the hatch needs to be drilled anyway, and leave a few extra drill holes in the base only in the middle. Then bolt it through with a couple of plates on the outside help reinforce the shape and a tube inset at each bolt through hole to stop over clamping. I will then inject the adhesive in through the spare holes and let it go off. The open holes will give the expanding adhesive somewhere to go.

Current Plan

I have  bunch of stuff to do, and am feeling a little overwhelmed about which job to tackle next (at 19:30 on a Sunday night). I’m now getting over the disappointment, time and materials lost, and have a plan. The plan is:

  • buy beer
  • make savoury bacon cupcakes with my daughter
  • watch The Blues Brothers with the kids.
  • Sleep.

Access Hatches – it’s not easy to do it well

IMG_0121.JPGHere’s the transmission tunnel buck, and I have the moulds from it, after some finishing. It’s a split mould, one top, and two sides. Now I have to start thinking really hard about just how many access panels I put in, and how to make them.

I’m replicating the recess and access panels so wherever I need to fit them on the tunnel, they will all fit to each other and be interchangeable.


IMG_0120.JPGHere is the closer up view of the access hatch, or at least the recess for it. I want the finished panel to both fit flush, and be bolted through. This recess on the right will be cut out, apart from leaving a 12mm rebate all the way around to allow the panel to fit an bolt through (into the rebate).

I will reinforce back of the rebate, and use 5mm nutsert flush fitting thread things to receive the socket-headed cap screws. The recess is 5mm deep, as is the head of a 5mm cap-screw. I’ll bond the nutserts in from the back, and use my friendly neighbourhood cad package to get the spacings right.

Today, I’ve made a mould from the positive mould part made from the recess (gel-coat and three layers of 450, poly resin). This means I’ve now replicated the recess above, and I’m using that to make a trial CF part.

The plan to make the flush fitting panel is:

  • 3 layers of 350gsm CF to capture the back of the panel, and this should be a perfect fit into the recess
  • drill the panel for the mounting holes.
  • Bond some 1mm washers to the inside of the base panel to spread the load of the cap screw. I wish I had better washers that were a larger washer size with still a 5mm hole. Araldyte will be fine for this.
  • cut some flat CF sheet I have spare to the profile of the top of the part. It should sit totally flush with recess above.
  • mix some epoxy with glass micro bubbles to act as an adhesive and core material all in one go. The micro bubbles reduce density by adding air, in essence. When they’re in the box before they’re mixed, they’re like an ultra-lightweight fine powder. Definitely not something of which one wants a lung-full.
  • put the panel-back in the mould, and fill it with the epoxy/glass bubble solution and put the top on. Let it set.
  • Crack it back out of the mould again, and drill through from the back right through the front.
  • Drill through from the front with a drill the same diameter as the cap screw with a mm or two to spare. This needs to be done carefully to countersink the cap screw head. I think I’ll be setting the depth gauge on the pillar drill.

There we have it – one flush panel, with recessed bolt heads and some structural strength. I’ve spent quite a while today thinking about how this would work and I think it’s a good plan. A bit of a faff mind.


BOM for access hatch, lower part; positive lessons learned

Bill of Materials

  • 3 layers of 300gsm cloth
  • 80g of mixed resin consumed (120g wasted)
  • mixed with fast hardener

Lessons Learned

  • I mixed too much resin (195g mixed: 150g of resin, 45g of hardener) and had 130 left in the pot afterwards. When the exotherm kicked in, the resin in the pot got to 82C. I should not to be thrown in the bin until it’s cold again, else there will be fire. I always leave pots like this out overnight.
  • I’d not want to just mix 80g because it would be dragging bubbles through as it ran out in the pot, so some waste is inevitable. I’ll go more for 120g mixed next time.
  • Degassing the resin makes a difference to how much air bubbles over the part. I used the catch-pot which doesn’t have a huge capacity and the lid is as splattered as a plaster’s radio so it’s not easy to see how much it bubbles. However, it did bubble a lot
  • 5 mins degassing (not quite enough) and a slow infusion (10m or so) was just enough before I could feel the cup start to warm up. It was a couple of minutes from gelling, so I turned the resin feed off.
  • There was much less resin bubbling up the exit tube, so that tube wasn’t scrap (yeayy).

Cure Time

I’m giving it 1hr at 40C, then 6hr at 60C. This will give it the maximum theoretical strength.

Shiny transmission tunnel mould

Fixing a Dodgy Mould

So, I cut a corner and had someone do some finishing on my mould because I was pushed for time. It was a mistake – the mould had a lot of resin dripped on it, and the surface gel-coat was very orange-peely.

It was a perfectly servicable mould, but the transmission tunnel is something everyone will see when they look into the car, so I want it to be facing quality.

In order to sort the mould, I tried 600 grit on a sanding block, and it was making an impact, but not flatting it out as fast as I wanted (i.e. in one lifetime). Then I remembered that I had bought some 400 grit disks from East Coast Fibreglass’s clearance page. Add the disk to the heavy duty polisher I have, and off we go. They really chew through the gel-coat. I finished that with a 1000 disk and polish. After polishing, I saw that I had some fine scratches, so I flatted it by hand (600 and then 122 grit), and polished it back. Again, some scratches. I don’t know if they were being introduced by the polishing sponge, but I don’t have the will to keep trying.

photoWhat I have got is a mirror finish on the surface now, with some minor scratches which you can just see at the bottom. I’m hoping that a few layers of release wax will help fill the scratches, and I’m going to use a clear gel-coat before I infuse, which will then end up with some slight positives where the scratches are. These will be easy to flat and polish by hand.

I don’t want to flat back again in case I end up going through the black gel-coat.

I’m not sure if I’ve contaminated my polishing sponge or not here – more experimentation is required I think.